How to create custom formations in the Sports template
On some occasions, the default formations provided in the Sports template may not cover the positions you need. In such cases, you should use a custom formation type. You can either provide an X and Y position for each player on the field in the Data tab, or use the Custom formation preset in the Preview window.
This help doc focuses on how to provide positions through the Data tab.
Use positions from the Data tab
TIP: Using this method is particularly useful if you will be creating a sports visualization with a filter. If you are aiming to visualize different teams with different formations, this is the easiest way to achieve this.
1
The Data tab of the Sports template contains two unique column bindings – X and Y position. The X position defines the horizontal position of each player, while the Y position is responsible for the vertical positioning.

WARNING: Make sure that in the Preview tab > Players > Players position, you have chosen the Positions from data setting.
2
Before you provide your positions, you should take into consideration whether to use a full or half pitch, as well as whether to plot players from the top or from the bottom. This is crucial when choosing the X and Y positions of your players.

3
Once you have selected your desired layout, you can add a row for each player in the Data tab. Add two more columns and call them X position and Y position. Bind them under the column bindings respectively. If there are no values in these columns, your players will be stacked on top of each other in the top or bottom corner of the visualization.

4
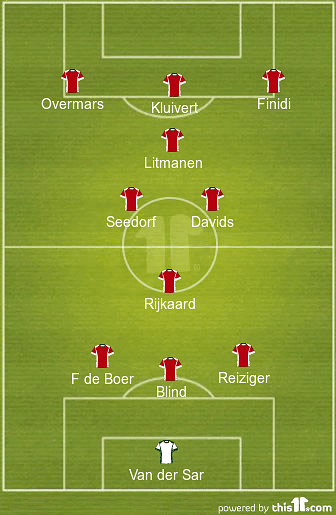
For this example, we will be recreating the following formation. We will be plotting our players from bottom to top on a full football pitch.
 5
Let's start with the X position. The horizontal position of your players could be any number within the 0-4 range. The 0 will be furthest on the left and the 4 will be furthest on the right.
5
Let's start with the X position. The horizontal position of your players could be any number within the 0-4 range. The 0 will be furthest on the left and the 4 will be furthest on the right.

TIP: You can use the goalkeeper as your anchor, since they will always have an X/Y position of 2/0.
6
In the image above, Van der Sar (our goalkeeper) is centered right in the middle of the pitch (X position=2). Blind is right above him, meaning that this player will also have an X position of 2. On his left, F de Boer will take an X position=1, while on the right, Reiziger will take an X position=3.

7
To move the three players further up from the goalkeeper, we now need to adjust the Y position. The vertical position can generally go between 0 and 8, with 8 being the very opposite of your goalkeeper. However, depending on whether you are plotting from the top or from the bottom, the positioning of your 0 can change.

TIP: Try to keep your players symmetrically aligned by making sure that their Y position is the same, and their X position equals the same distance in two opposite directions from the same anchor point.
8
Continue with the rest of the players until you get the desired formation.


